* I prefer to use any red preserve, especially strawberry or raspberry, but feel free to use any preserves that you have available or you like.
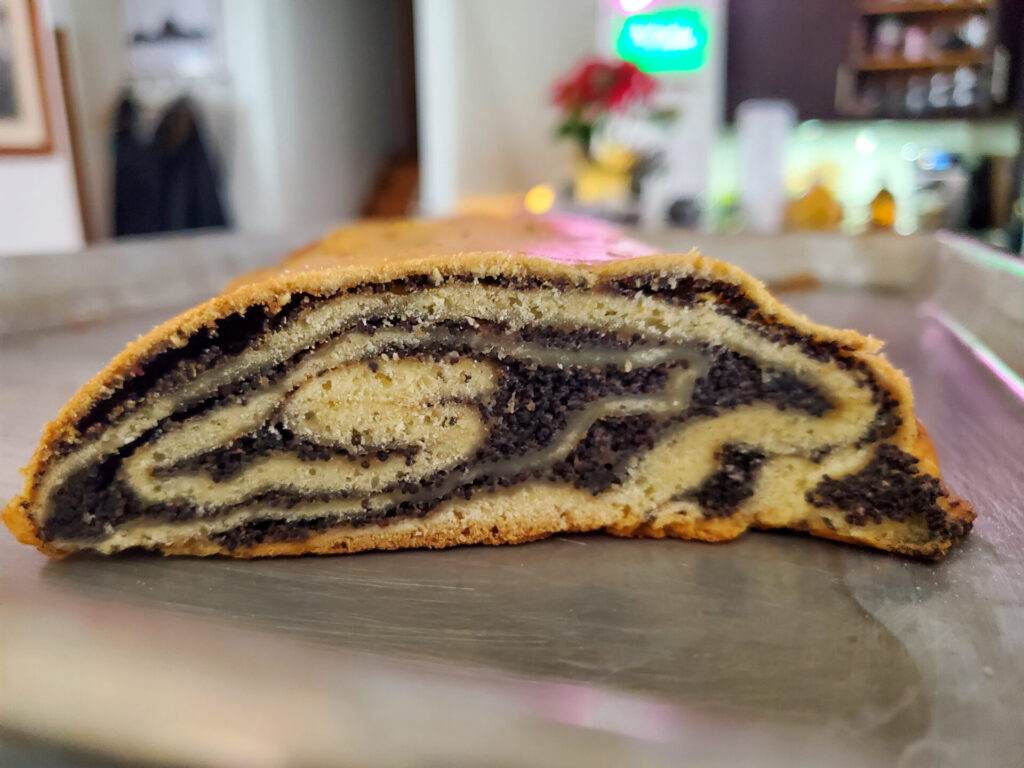
Poppy Seed Strudel
12 servings (1 strudel, 1 slice per serving)
This version of poppy seed strudel is a staple for many European countries because of its’ delicious, decadent, and simply irresistible taste. In this recipe, you will be introduced to the Czech version of poppy seed strudel, which is typical for a higher percentage of poppy seed filling and a...
Read more... thinner layer of dough.
Read lessx saved
 Tom the Chef Founder
January 22, 2024
Ingredients:
Dough:
- 2 ½ cups of bread flour (or All-Purpose)
- Extra flour for flouring surface
- ¼ cup of granulated sugar
- 1 TSP of active dry yeasts
- ½ TSP of salt
- ¾ cup of milk - preheat in microwave to lukewarm (about 90 to 100°F)
- 1 egg
- 4 TBSP of unsalted butter - room temperature (1/2 stick, cut into small pieces )
Poppyseed topping:
- 2 cups of milk (adjust if needed, preferably whole milk*)
- 1 cup of poppy seeds (*)
- 1 TSP of cinnamon
- ½ cup of granulated sugar (*)
- ¼ cup of preserve of your choice
Tools:
- 1x Measuring Cups
- 1x Measuring Spoons
- 1x Kitchen Mixer with Hook Attachment or Large Mixing Bowl
- 1x French Whisk
- 1x Plate
- 1x Medium Sauce Pan (4QT)
- 1x Wooden Spoon or High-Temperature Silicone Spatula
- 1x Silicone Spatula
- 1x Medium Mixing Bowl (3 – 4 QT)
- 1x Rolling Pin
- 1x Measuring Pitcher or Small Glass/Ceramic Bowl
- 1x Silicone Brush
- 1x Baking Sheet with Parchment Paper or Silicone Matt
Directions:
1. Dough:
1.1. Place into a kitchen mixer with a hook attachment:
2 ½ cups of bread flour
¼ cup of granulated sugar
1 TSP of active dry yeasts
½ TSP of salt
Shortly stir with a whisk just enough to combine all ingredients (about 30 seconds).
1.2. Add:
¾ cups of lukewarm milk – about 90 to 100°F
1 egg
4 TBSP of butter – soft
Knead on low speed until all ingredients are partially incorporated (about 1 – 2 minutes).
1.3.
Then, increase the speed to medium-high and knead until a slightly sticky dough is formed (about 1 – 2 minutes).
2. Rising the dough:
2.1.
Remove the mixing bowl from the mixer and cover it with a plate.
2.2.
Let it rise in a warm place until it has doubled in size or at least gained 50% (about 2 – 3 hours).
3. Poppy seed filling:
3.1. Place a medium sauce pot on medium-high heat and add:
2 cups of milk
1 cup of poppyseeds
Briefly stir and cover with a lid. Bring to a simmer (about 195°F) with occasional stirring.
3.2. Lower the heat to medium and cook with occasional stirring until poppy seeds soften (about 12 minutes).
Notes:
- If the milk evaporates too much during this step, add some extra milk.
- If you have a too-powerful burner, you may want to lower the heat to medium-low.
3.3.
Then remove the lid, increase heat to medium-high, and cook until the milk gets totally absorbed and evaporated, which usually takes about 5 – 10 minutes (some liquid could still be present for further steps).
3.4. Place the cooked poppy seeds into the medium mixing bowl and add:
1 TSP of cinnamon
½ cup of granulated sugar
¼ cup of preserve of your choice
Thoroughly stir until fully combined. Set poppy seed filling aside for a later step.
Important:
- Fully cool filling for easier preparation.
- If your dough is ready even right after the filling preparation is completed, you do not need to wait until it cools – but keep in mind to work very precisely and fast because the hot filling will make the dough more sensitive, and it will be easier to rip it.
4. Brushing mixture:
4.1.
Prepare a brushing mixture by briefly hand-whisking 1 egg with ¼ cup of milk in a measuring pitcher (for whisking you can also use a silicone brush).
5. Form the strudel:
5.1.
Place the dough on a lightly floured surface, lightly flour the top of the dough, and then using a rolling pin, flatten it into a square shape (about 18 x 18″).
5.2.
Place on the baking sheet with parchment paper, with one side of the dough being about ½ off the baking sheet.
5.3. Brush about 1” of one long side without filling.
Note:
You are brushing just one of the two of the long sides. This brushed side will be the final (top layer) of the strudel and the brushing mixture will work as a glue.
5.4.
Evenly distribute the filling on the top of the entire strudel while keeping the brushed 1” without filling.
5.5.
Roll into a long roulade and make sure that the entire dough is rolled up – do not leave any part of it unrolled.
5.6.
Brush the strudel with part of the brushing mixture (keep the rest for the second brushing).
6. Proofing:
6.1. Let it proof in a warm place for about 15 minutes to let the dough relax and slightly expand.
Note:
Relaxing the dough is an important step that allows the dough to regain its’ ability to expand again during its’ upcoming baking – the relaxed dough will be less dense.
7. Baking:
7.1.
Preheat oven to 350°F.
7.2.
Gently brush the strudel with the remaining brushing mixture right before baking.
7.3.
Bake in a preheated oven until it turns golden brown (about 30 – 40 minutes).
7.4.
Test with a toothpick.
7.5.
Remove from the oven and let it cool for at least 3 minutes before serving.
You can increase the rising time based on your convenience for up to 6 hours.
About the Author:
Tom the ChefFounder
# 1
210 Followers
- Published Recipes: 270
- Av. Recipe Evaluation:
- Location: Iowa, USA
- Member since: 2023-02-02
Recipes
Try Other Recipes from Same Category!
Frgal Kolach with Pear Filling
Tom the Chef FounderFrgal Kolach with Plum Filling
Tom the Chef FounderClassic American Apple Pie
Pumpkin Cheesecake
Easy Mixed Berry Turnovers
 ChefLynn Cool Cook
Eggnog Pumpkin Flan Cake – "Holiday Chocoflan"
ChefLynn Cool CookSpiced Sweet Potato Cheesecake
ChefLynn Cool CookPudding Supreme
Tom the Chef FounderApple Strudel
Tom the Chef FounderBuchty - Czech Sweet Filled Buns
Tom the Chef FounderDisclaimer
- General Information Content on this page above, including the content provided on www.CookingHub.com, including all recipes, articles, and other materials, is for general informational purposes only. This content reflects the personal opinions and experiences of its authors and is not intended to provide professional dietary, medical, legal, or political advice. Please consult a qualified professional before making any decisions based on the information presented here.
- Content Ownership and Use Content on this page above, including content published on CookingHub.com is owned by the individual authors who created it. Only the authors can access, modify, or delete their content from the platform. Our content may be embedded on third-party websites and blogs without modification. No reimbursement will be provided for this use. If an author removes content from CookingHub.com, it will no longer be available through any embedded links.
- Limitation of Liability Neither www.CookingHub.com (operated by the CookingHub Foundation) nor content authors are responsible for any outcome or consequence resulting from the use of information on this site. This includes, but is not limited to:
- Food Safety: Any health risk related to food handling, food quality, or failure to follow USDA recommendations (including minimum safe cooking temperatures).
- Preparation Safety: The proper and safe handling of cooking equipment or its suitability for any given task.
- Recipe Outcomes: The final look, taste, or success of following a recipe.
- Ingredients and Equipment: The sourcing of ingredients, tools, equipment, or anything else related to the preparation and consumption of food.
- Nutritional and Dietary Information: The accuracy of nutritional data. This information is provided as a courtesy and should not replace advice from a medical provider. You are responsible for verifying that a diet is suitable for your personal health needs.
- Errors and Omissions: Any potential errors, typos, or unclear directions in articles and recipes.
- User Responsibility All readers, visitors, and users of embedded content are solely responsible for evaluating recipes and articles. You must make your own decisions about whether to follow the steps and recommendations provided. It is your responsibility to ensure that ingredients and preparation methods are safe and appropriate for your personal dietary restrictions and health conditions.
Share
Click on the icons below to share "Title of the item to share"