 Tom the Chef Founder
How to Separate Eggs
October 19, 2023Separating eggs isn’t as hard as many people think. Become a master of this important cooking technique with info from my article.
Despite its unusual name, May Beetle Cookies (Chrousti) are among the most decadent cookies you’ll ever come across. These cookies, with their rich flavors and delightful texture, are a true culinary delight. It’s a challenge to find a treat that can match the indulgence these cookies offer. Originating from the...
Read more... heart of Europe, these cookies carry a unique charm that’s hard to resist. Whether you’re a seasoned baker or a beginner, this recipe is a wonderful addition to your repertoire. Once you’ve tasted these May Beetle Cookies, you’ll understand why they hold such a special place in the world of desserts.
Read less Tom the Chef Founder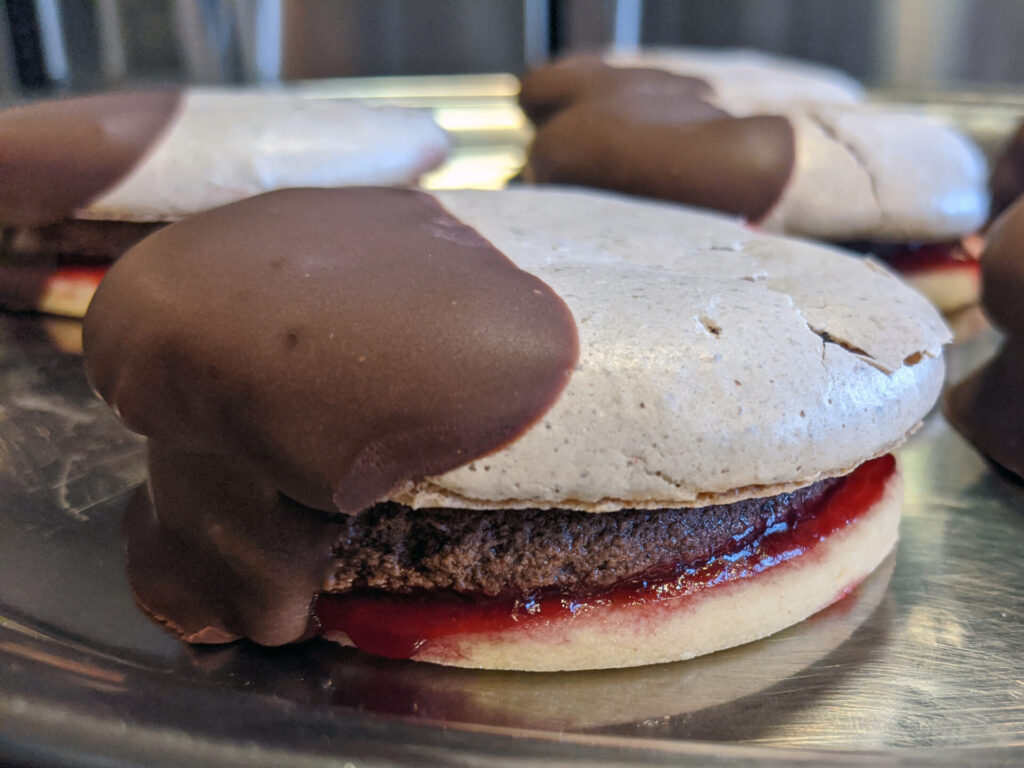
Dough:
1 ½ cups flour
1 cup of confectioners’ sugar
¼ TSP of baking powder
Lemon zest from 1 lemon
Shortly stir together using a hand whisk until nicely combined (about 1 minute).
1 ¼ sticks of butter – soft
1 large egg
½ TSP of Vanilla Extract
Process on slow speed until all ingredients are partially combined.
Then increase the speed to medium-high and process until the dough is formed (about 2 – 3 minutes).
Resting time:
Tip:
If you want to work with the dough soon, form it into a disk, not a roll shape.
Important:
If the dough in the refrigerator fully hardens (if left for a longer time, for example, overnight), remove from the refrigerator about an hour before cookie cutting.
Preheat oven to 350°F.
Notes:
Place the dough on a floured surface and lightly flour the top of the dough.
Using a rolling pin, flatten the dough into about 1/8″ – 3/16“ thickness (based on your preference).
Important:
If you are using multiple different options of cookie cutters, make sure you cut even numbers of each shape — to be able to later create a “sandwich”.
Important:
Make sure they are not touching each other (about 12 – 15 on each baking sheet).
Tip:
Make manipulation with the vanilla bottoms easier by using an icing spatula.
With the leftovers from the cut dough: quickly form the dough from them (with your hands) and roll them again with a rolling pin to cut more cookies.
Bake:
Bake in a preheated oven until fully baked. The surface turns from a doughy texture to solid but slightly fluffy (about 8 – 10 minutes).
Notes:
Let totally cool on the baking sheet before assembly (or using an icing spatula, move to the cooling rack).
Tom the Chef FounderSeparating eggs isn’t as hard as many people think. Become a master of this important cooking technique with info from my article.
Set oven to preheat to 270° F.
Walnut mixture preparation:
1 ½ cups of walnuts – whole
1 ½ TSP of cocoa powder
1 ½ TSP of coffee
4 TBSP of breadcrumbs
¼ cup of all-purpose flour
Process on high speed until a fine texture is reached – no large chunks are present (about 1 – 2 minutes).
Batter:
6 egg whites – room temperature
¼ cup of confectioners’ sugar
Whisk on medium speed to get more air into the egg whites and to make the egg whites foamy (about 2 – 3 minutes).
2 cups of confectioners’ sugar (the rest of the total amount)
Increase the speed to high and whisk until done – soft to medium peaks are formed (about 4 – 6 minutes). Note: If your egg whites were taken directly from the fridge (they aren’t room temperature), this step can take up to 20 minutes.
Lemon zest from 1 lemon
Walnuts mixture from step 2.2.
Thoroughly but gently stir with a spatula until fully combined.
Using a 1 OZ disher (or set of spoons), place the batter portion on the baking sheets with the parchment paper. Leave at least 2” space between each. From this recipe you should be able to create 25 – 30 cookies.
Baking:
Bake in a preheated oven until done – fully baked and crunchy on the top (about 40 – 45 minutes).
Let fully cool before the next step – they will be very fragile right after baking.
When cooled, gently remove from the parchment paper. If partially stuck, gently help to release with an offset spatula.
Cream base:
2 cups of milk
4 egg yolks
1 bag of vanilla pudding powder
½ cup of cocoa powder
Stir with a whisk until all ingredients are incorporated (about 1 minute).
Place the pot on medium heat and cook while constantly stirring with a whisk until it thickens (about 2 – 3 minutes).
1 TSP of vanilla extract
4 TBSP of rum extract
Stir together with a whisk until fully incorporated (about 1 minute).
IMPORTANT:
If you decide to place it into the refrigerator overnight, make sure to wrap with plastic food wrap and remove the cream base from the refrigerator about 30 minutes before processing in the next step – the cream base needs to have room temperature before further processing.
Final processing:
4 sticks of butter – soft
Cream butter on high speed until the butter gets nicely airy (about 2 minutes).
2 ½ cups of confectioners’ sugar
Whisk on slow speed until nicely combined (about 1 minute).
Then increase the speed to high for about 2 – 3 minutes.
Cream base from step 2
Whisk on high speed until all ingredients are incorporated and a creamy texture is reached (about 2 – 3 minutes). Do not place into the fridge and leave it on the counter for the next step (if you do so, the cream will harden).
Spread the raspberry preserve on the Linz tart bottom.
Using a 1 OZ disher, place the cream on each Linz tart bottom with preserve.
Place the meringue chocolate-coffee top on the top of the cream and gently press and turn at the same time to evenly distribute the cream.
When all are done, place into the fridge to cool before the next step (at least 30 minutes, but best is for 1 hour).
Chocolate coating or dipping is a very fun process. If you follow a few simple rules, you will succeed. In this section we will be looking at techniques for coating a cake or dipping fruit or cookies into the chocolate.
Tom the Chef FounderPrepare ½ of the recipe for the chocolate coating and then dip part to coat half of each cookie.
Let the dipped cookies rest in the refrigerator for at least 15 minutes before serving.
Refrigeration of the cookies is necessary.
 olivia.wyles Resident Chef olivia.wyles Resident Chef olivia.wyles Resident Chef olivia.wyles Resident Chef olivia.wyles Resident Chef olivia.wyles Resident Chef Tom the Chef Founder Tom the Chef Founder Tom the Chef Founder Tom the Chef Founder
Share
Click on the icons below to share "Title of the item to share"