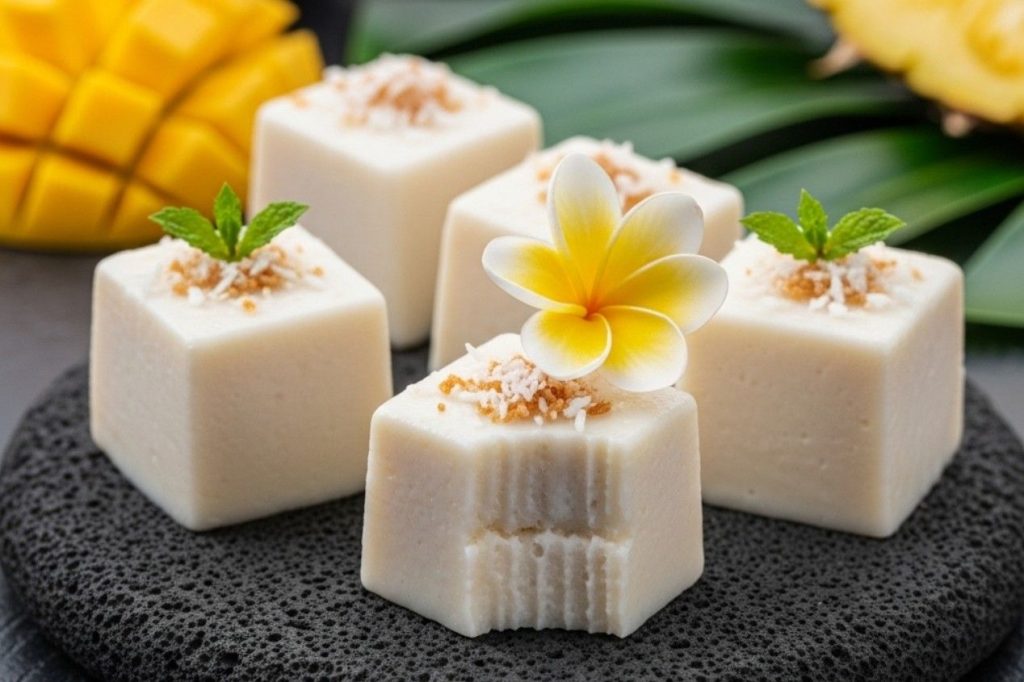
Coconut Pudding Haupia
9 servings
Discover the delightful taste of the islands with this authentic Coconut Pudding Haupia. A traditional Hawaiian dessert, Haupia offers a unique texture that is firmer than pudding but softer than gelatin, simply melting in your mouth. This simple yet elegant recipe captures the pure, sweet essence of coconut, making it...
Read more... a perfect treat for any occasion. Enjoy a true taste of paradise with every bite of this delicious Coconut Pudding Haupia.
Read lessx saved
 themaverickflavor Rising Star
July 21, 2025
Ingredients:
Haupia
- 2 cans of coconut milk (13.5 oz cans of full-fat, unsweetened (about 3 ⅓ cups))
- ¾ cups of granulated sugar (adjust if needed)
- ¾ cups of cornstarch
- ¾ cups of water
- 1 Pinch of salt (adjust if needed)
Tools:
- 1x Measuring Cups
- 1x Measuring Spoons
- 1x Medium Sauce Pan (4QT)
- 1x Whisks
- 1x Baking Dish (8x8 inch square baking pan or glass dish)
- 1x Spatulas
- 1x Small Mixing Bowl (about 1 QT)
- 1x Knives
Directions:
1. Prepare the Pan:
Let’s start the preparation of Coconut Pudding Haupia by greasing the pan.
- Lightly grease your 8 x 8 inch pan.
Note:
The light layer of moisture will help prevent the Haupia from sticking, making it easier to remove once set.
2. Combine Coconut Milk and Sugar:
- In a medium saucepan, before turning on the heat, add the cans of coconut milk and the sugar.
- Whisk them together until the sugar is mostly dissolved.
3. Make the Cornstarch Slurry:
- In a separate small bowl, whisk together the cornstarch, water, and the pinch of salt until the cornstarch is completely dissolved and the mixture is smooth.
Note:
This mixture is called a slurry, and creating it separately is the key to a lump-free Haupia.
4. Cook the Pudding:
- Place the saucepan with the coconut milk and sugar mixture over medium heat.
- Bring it to a gentle simmer, stirring occasionally.
- Once simmering, slowly pour the cornstarch slurry into the saucepan while whisking continuously.
Important: It is crucial to keep whisking to prevent any lumps from forming.
5. Thicken the Haupia:
- Continue to cook, whisking constantly, for about 2 – 5 minutes. The mixture will begin to thicken noticeably.
- Keep stirring until it reaches the consistency of thick pudding or mayonnaise and coats the back of a spoon.
- Be sure to scrape the bottom and corners of the pan.
6. Pour and Chill:
- Once thickened, immediately remove the saucepan from the heat.
- Pour the Haupia mixture into your prepared 8×8 inch pan.
- Use a spatula to quickly spread it into an even layer.
- Let it cool on the counter for about 20 minutes before covering it with plastic wrap and transferring it to the refrigerator.
7. Set and Serve Coconut Pudding Haupia:
- Chill the Haupia for at least 3 hours, or until it is completely firm.
- Once set, you can slice it into 9 squares directly in the pan.
- Serve chilled, on its own, or with fresh tropical fruit like mango or pineapple.
- It’s also delicious as a topping for white cake, often served at celebrations in Hawaii.
- Enjoy your homemade taste of the islands!
About the Author:
themaverickflavorRising Star
# 9
53 Followers
- Published Recipes: 9
- Av. Recipe Evaluation:
- Location: USA, Hawaii
- Member since: 2025-05-07
Recipes
Try Other Recipes from Same Category!
Pudding Supreme
 Tom the Chef Founder
Disclaimer
- General Information Content on this page above, including the content provided on www.CookingHub.com, including all recipes, articles, and other materials, is for general informational purposes only. This content reflects the personal opinions and experiences of its authors and is not intended to provide professional dietary, medical, legal, or political advice. Please consult a qualified professional before making any decisions based on the information presented here.
- Content Ownership and Use Content on this page above, including content published on CookingHub.com is owned by the individual authors who created it. Only the authors can access, modify, or delete their content from the platform. Our content may be embedded on third-party websites and blogs without modification. No reimbursement will be provided for this use. If an author removes content from CookingHub.com, it will no longer be available through any embedded links.
- Limitation of Liability Neither www.CookingHub.com (operated by the CookingHub Foundation) nor content authors are responsible for any outcome or consequence resulting from the use of information on this site. This includes, but is not limited to:
- Food Safety: Any health risk related to food handling, food quality, or failure to follow USDA recommendations (including minimum safe cooking temperatures).
- Preparation Safety: The proper and safe handling of cooking equipment or its suitability for any given task.
- Recipe Outcomes: The final look, taste, or success of following a recipe.
- Ingredients and Equipment: The sourcing of ingredients, tools, equipment, or anything else related to the preparation and consumption of food.
- Nutritional and Dietary Information: The accuracy of nutritional data. This information is provided as a courtesy and should not replace advice from a medical provider. You are responsible for verifying that a diet is suitable for your personal health needs.
- Errors and Omissions: Any potential errors, typos, or unclear directions in articles and recipes.
- User Responsibility All readers, visitors, and users of embedded content are solely responsible for evaluating recipes and articles. You must make your own decisions about whether to follow the steps and recommendations provided. It is your responsibility to ensure that ingredients and preparation methods are safe and appropriate for your personal dietary restrictions and health conditions.
Share
Click on the icons below to share "Title of the item to share"