*You can substitute with pork loins or chops without bones or a boneless veal loin.
Chicken Cordon Bleu
4 servings
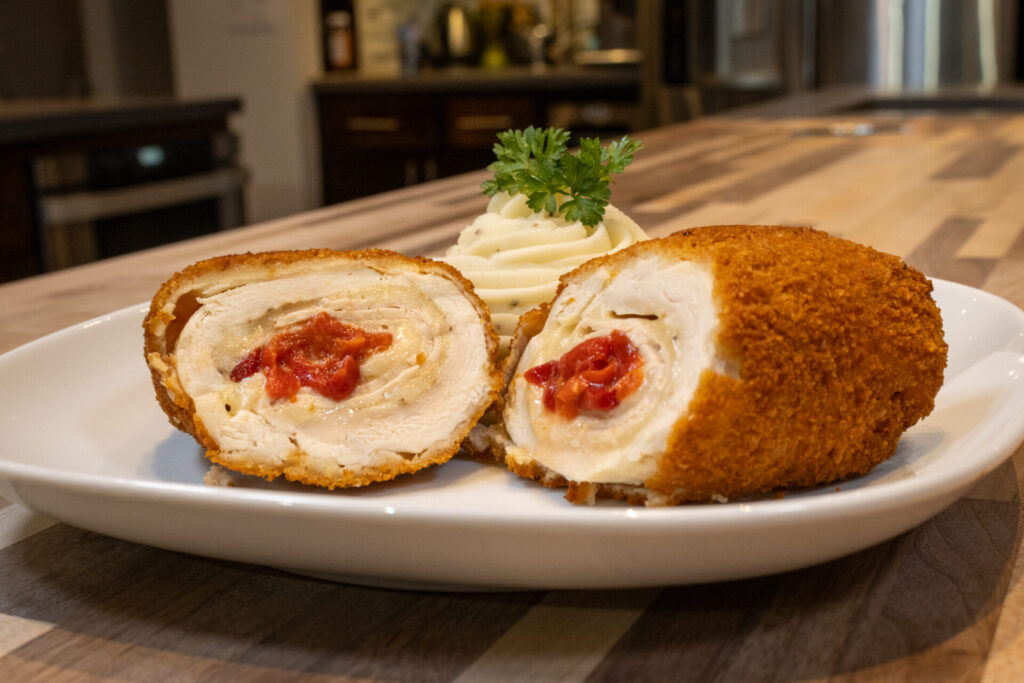
Chicken cordon blue is an upscale fried chicken prepared with a delicious surprise inside. This meal has it all. Delicious, breaded chicken filled with cheese, ham, and pimento peppers is simply irresistible. Shallow fry or deep fry; or for a more dietary-friendly version, prepare in your air fryer!
x saved
 Tom the Chef Founder
January 30, 2024
Ingredients:
Chicken:
- 4 PCS of chicken breasts (1 ½ - 2 LB*)
- salt
- pepper
FIlling:
- 4 slices of ham (I prefer boiled ham, but any kind of ham would work)
- 8 slices of Swiss cheese
- 4 TBSP of pimiento peppers (chili) - canned, drained (do not reserve liquid)
Breading station:
- ½ cup of all-purpose flour (adjust if needed)
- 2 eggs (adjust if needed)
- ¾ cup of milk (adjust if needed)
- 2 cloves of garlic - peeled and grated (or pressed) (adjust if needed)
- 3 cups of breadcrumbs (regular) (adjust if needed, preferably Panko preferably breadcrumbs from light bread)
Tools:
- 1x Measuring Cups
- 1x Cooking Spoon
- 1x Chef’s knife
- 1x Cutting Board
- 1x Meat Mallet (tendorizer)
- 1x Plastic Wrap
- 2x Medium Mixing Bowl (3 – 4 QT)
- 1x Small Hand Grater or Garlic Press
- 1x French Whisk
- 2x Plate
- 1x Deep Fryer or Pot and Thermometer or Air Fryer
- 1x Tongs
- 1x Food Thermometer (probe)
- 1x Cooling Rack or Paper Towels
Recipes
Best served with:
Directions:
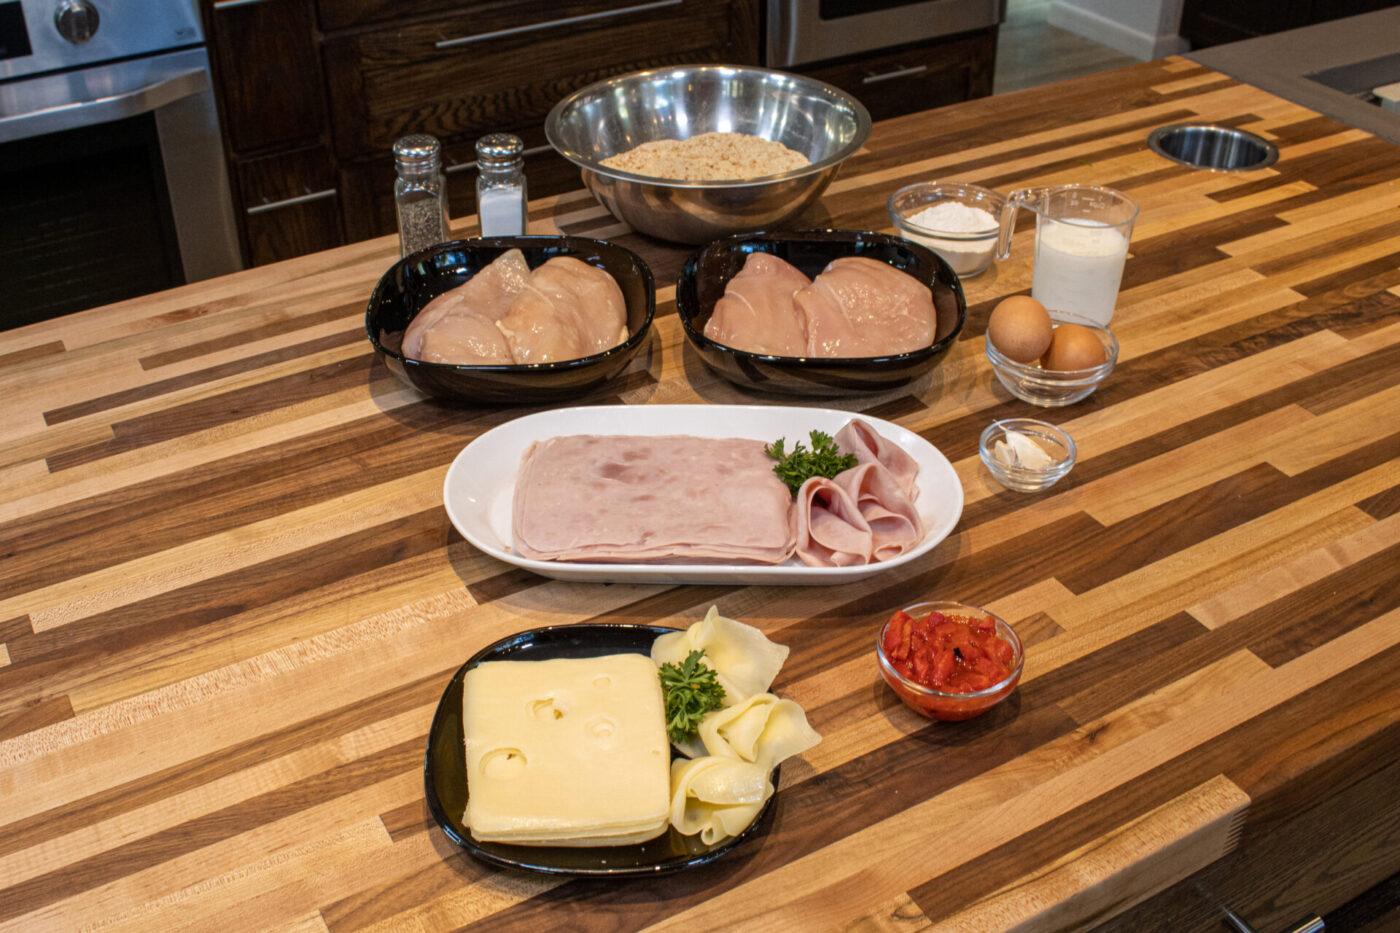
All ingredients you need for the preparation of the chicken cordon blue.
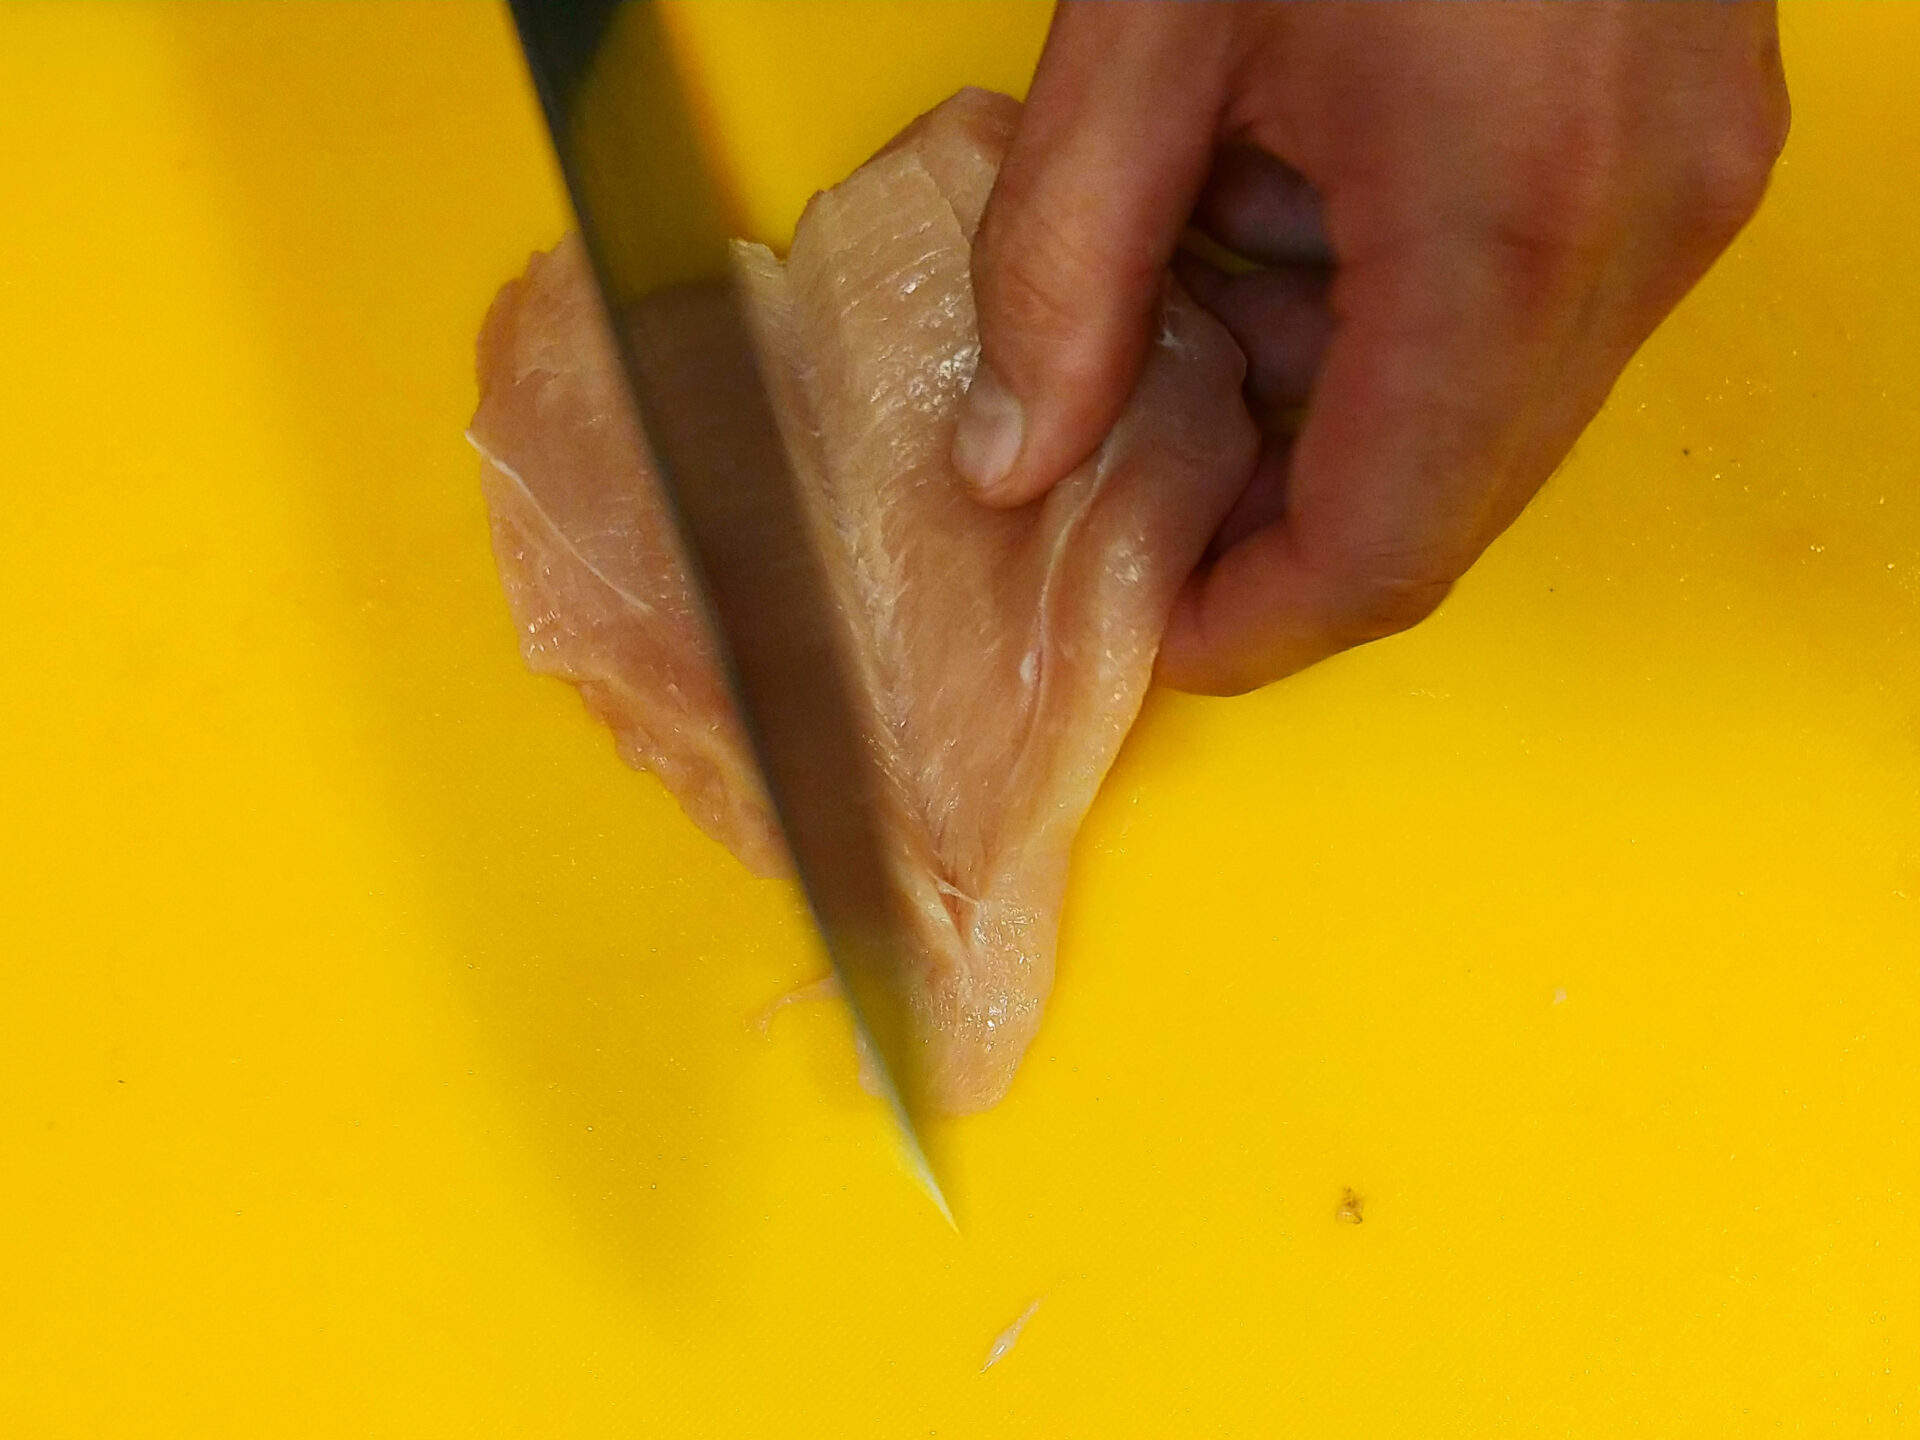
1. Meat preparation:
1.1.
Make sure that the chicken breasts are properly rinsed under cold water (to remove surface bacteria) and the unwanted parts are removed.
1.2.
Perform a butterfly cut to open up the chicken breast.
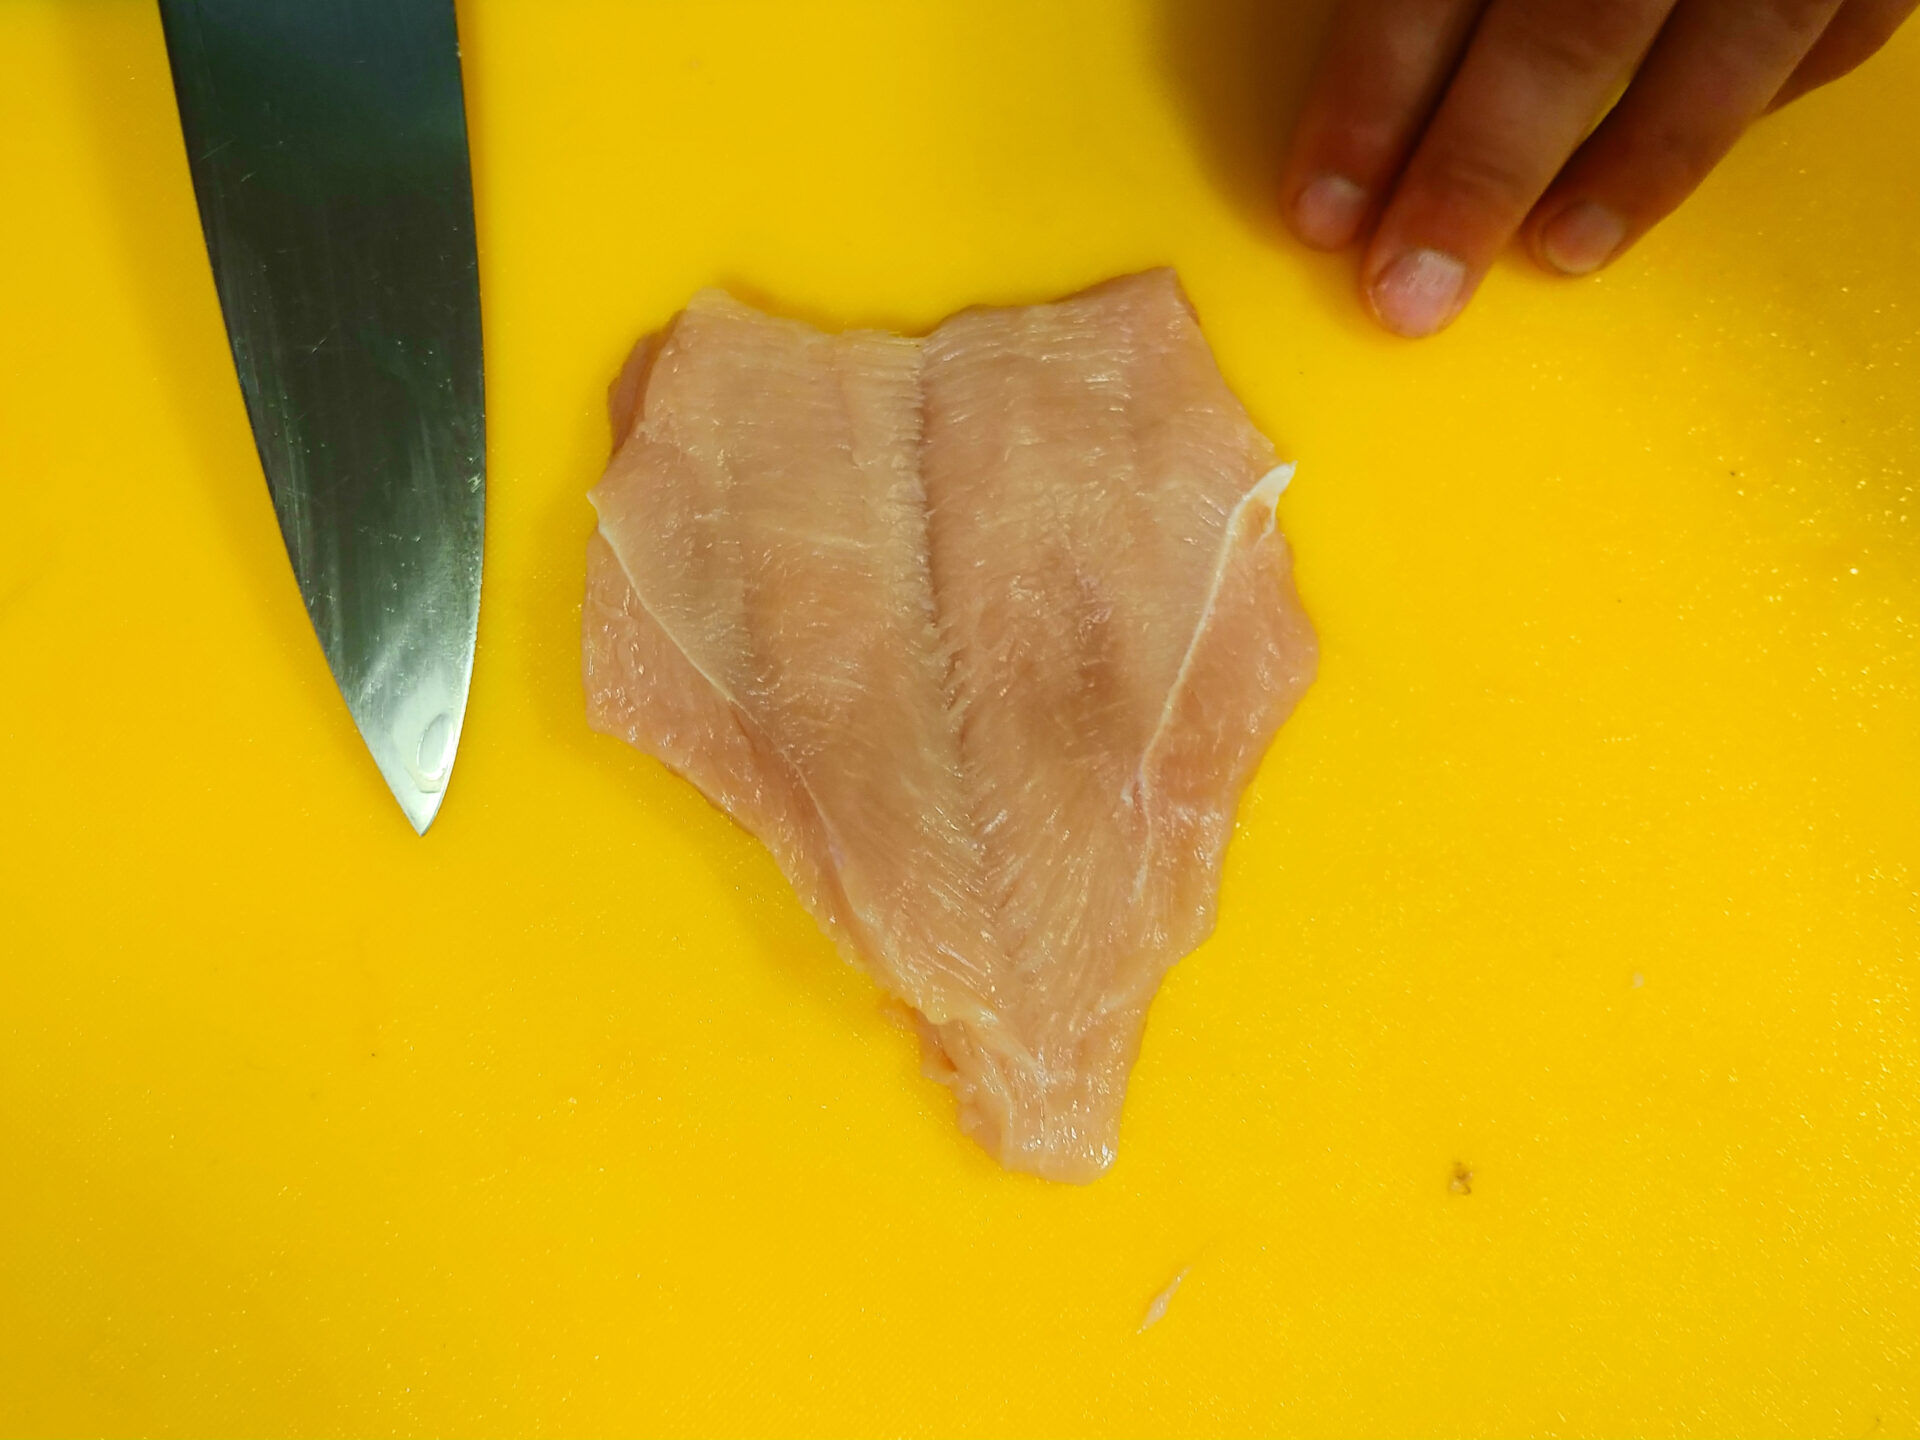
1.3.
Pound over plastic wrap to ¼” thickness using a meat mallet.
1.4.
Salt and pepper from both sides.
2. Form chicken pockets:
Notes:
- Chicken cordon blue is chicken with a filling, hence the name, chicken pockets.
- Form each pocket one-by-one.
2.1.
Place 1 slice of Swiss cheese in the middle of the chicken breast.
2.2.
Cover with one slice of ham.
2.3.
Cover the ham with 1 slice of Swiss cheese.
2.4.
Place on the top of the Swiss cheese, 1 TBSP of sliced (and drained) pimento peppers.
2.5.
Fold the filling into half and make sure it is in the center before rolling the chicken breast.
2.6.
Roll the chicken using the same method as you would when you roll a burrito. Start with folding the left and right side slightly over the filling (to prevent the filling from running out during frying), and then roll into a roulade shape.
2.7.
Place on a plate or baking sheet and repeat with the remaining chicken breasts.
2.8. Optional:
To reach a perfect round shape and make breading easy, optionally place a freezer for about 30 to 45 minutes. Or skip this step to speed up the process.
3. Breading station:
3.1.
Place ½ cup of all-purpose flour on a plate.
3.2. Prepare the egg mixture– place into a medium mixing bowl:
2 eggs
¾ cup of milk
2 cloves of garlic – grated
Whisk together until combined (about 1 minute).
3.3.
Place 2 cups of breadcrumbs into a second mixing bowl.
4. Bread the chicken pockets:
Notes:
- Perform each breading step from all sides.
- Fry as soon as possible after breading. If you can work fast and cook all of them at the same time, then bread them all at the same time. Otherwise, I would recommend breading them in batches which you will fry them while the remaining chicken is waiting in the freezer.
4.1.
First, bread in flour.
4.2.
Then, place in the egg-milk mixture.
4.3.
Then place in the breadcrumbs.
4..4. Then, bread again in the egg mixture and then the breadcrumbs.
Important:
If the endings of the pockets open up (or appear like they are opening), consider just additionally dipping them in the egg mixture and then breadcrumbs again to provide a better seal and prevent the cheese from running out during cooking.
4.5.
Put aside on a plate for the following frying and repeat with the remaining chicken.
5. Deep fry or shallow fry or air fry:
Note:
Work in batches based on the size of your equipment – make sure that pockets are not touching.
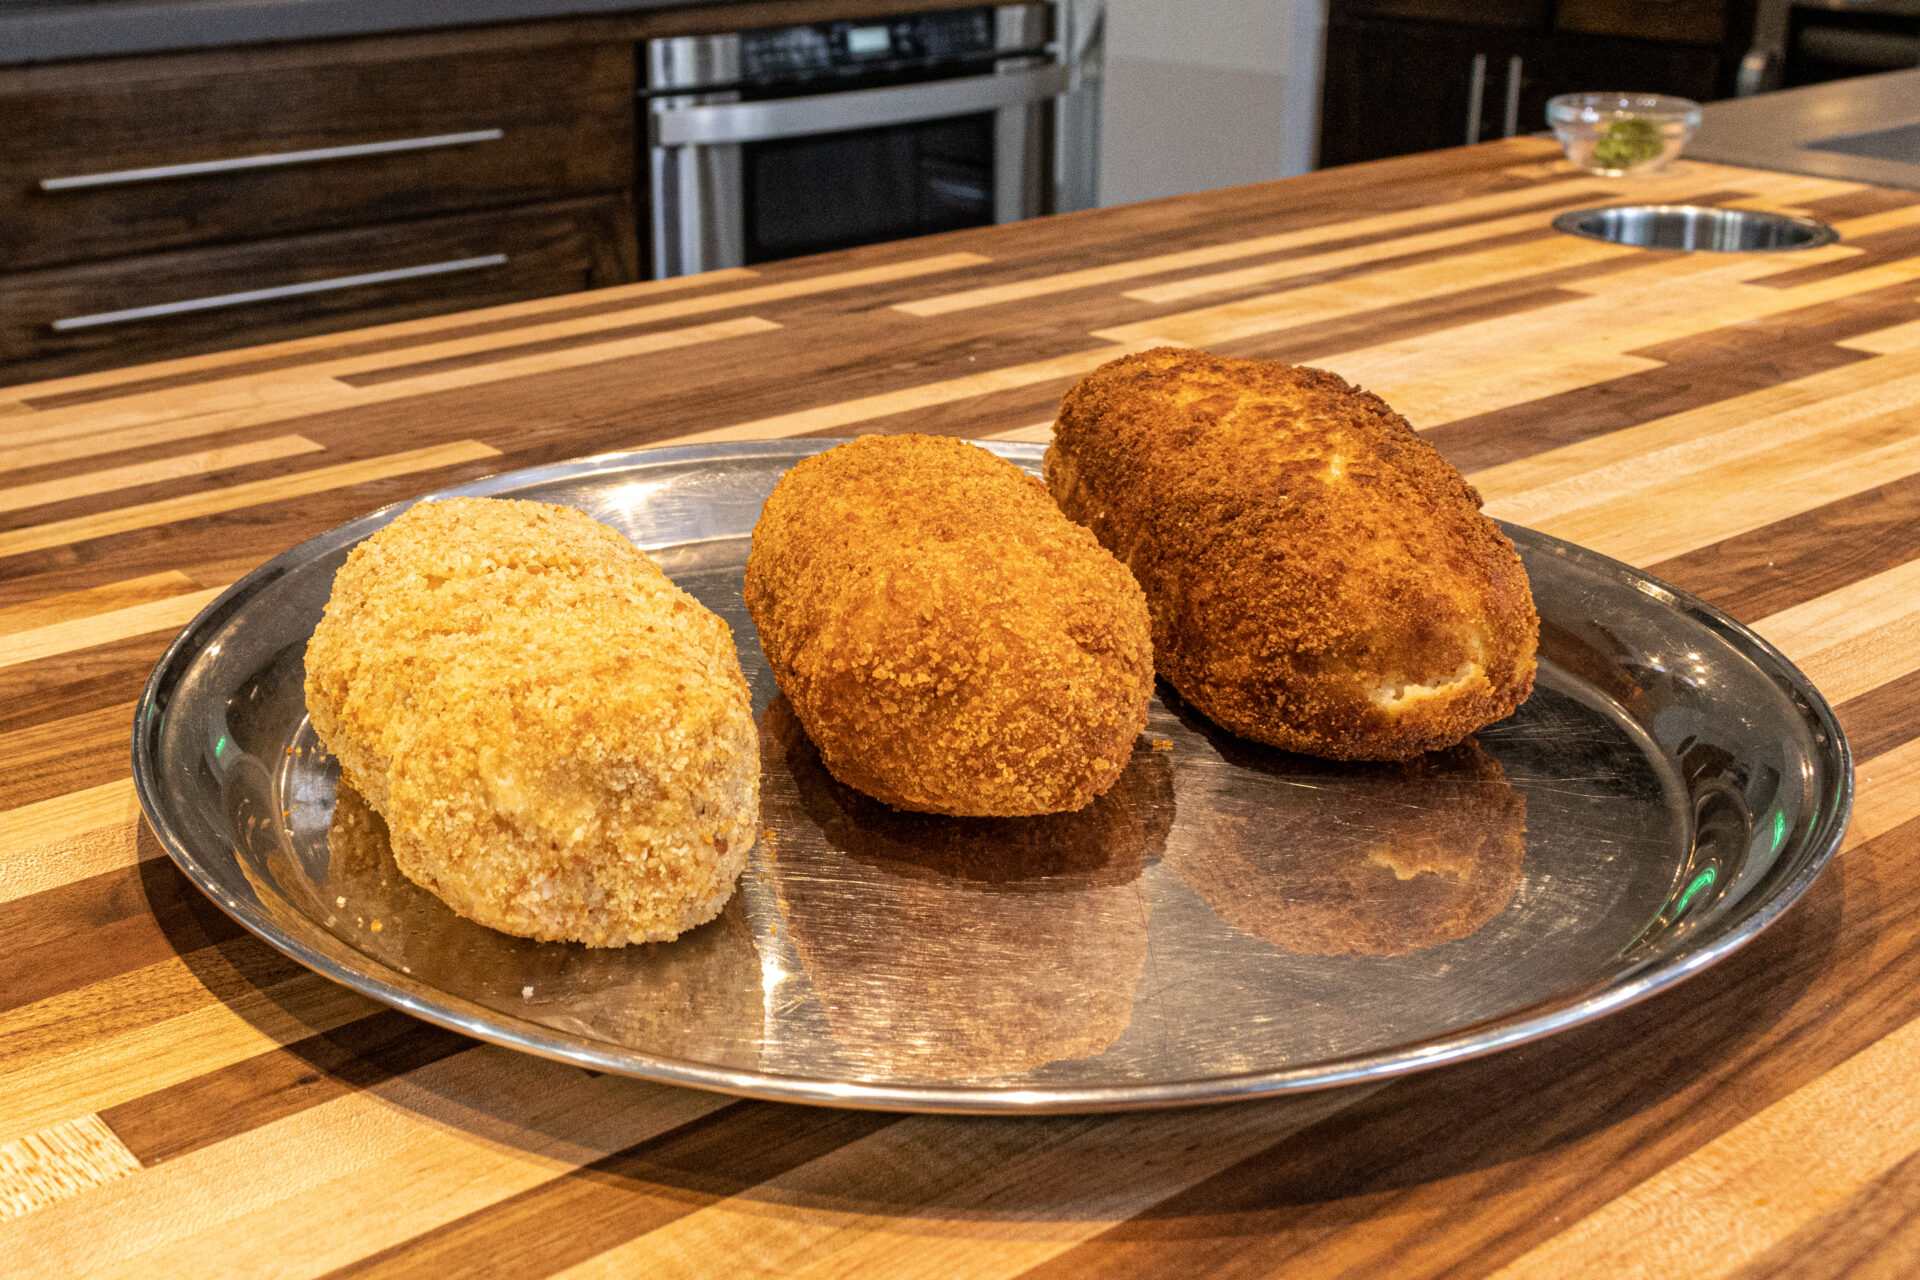
A. Deep fry:
Important:
Before you start, please read about the deep frying here.
1.
Preheat oil to 300°F.
2.
Carefully place chicken into the fryer one by one.
3.
Fry immersed in oil until a nice golden color is reached, and the pockets are fully cooked (about 6 – 8 minutes from each side). *
4.
When done, remove to a cooling rack and let the excessive oil drip off (about one minute).
B.
Shallow fry:
1.
Preheat the fry pan on medium-high heat with a layer of frying oil (between ¼ to ½”).
2.
Shallow fry until a nice golden color is reached and the chicken pockets are fully cooked (about 3 – 5 minutes from each side – in this case, shallow fry from all 4 sides). *
3.
When done, remove to a cooling rack and let the excess oil drip off (about one minute).
C.
Air fry:
1.
Preheat your air fryer to 330°F.
2.
Drizzle the bottom of the air fryer basket with frying oil.
3.
Place the chicken in.
4.
Drizzle the top of the chicken with oil.
5.
Air fry until a nice golden color is reached (about 11 minutes from each side).*
6.
Optionally, drizzle with more oil during air frying if needed.
6. Plating & serving:
6.1.
Cut each under a 45° angle for the best visual effect for serving.
6.2.
Sprinkle with salt and pepper.
6.2.
Serve with mashed potatoes or fries.
* Check with a food thermometer to make sure that you have reached the minimum recommended safe serving temperature for poultry of 165°F.
Kitchen Guide
Poultry
The USDA minimum safe internal temperature is 165°F.
The popular serving temperature is the same as the minimum serving temperature.
About the Author:
Tom the ChefFounder
# 1
210 Followers
- Published Recipes: 270
- Av. Recipe Evaluation:
- Location: Iowa, USA
- Member since: 2023-02-02
Recipes
Try Other Recipes from Same Category!
Classic Shepherd's Pie
Szegedin Goulash
Tom the Chef FounderPotato Pancakes Bramboraky
Tom the Chef FounderCreamy Butternut Squash Mac and Cheese
Zucchini Stuffed with Macaroni and Cheese
Pesto Chicken Sandwich with Parmesan
Tom the Chef FounderTuna Cakes
Tom the Chef FounderBurnt Garlic Steak Bites
 The Headless Chef Resident Chef
Lemon and Garlic Chicken
Tom the Chef FounderPesto Chicken Breasts
Tom the Chef FounderDisclaimer
- General Information Content on this page above, including the content provided on www.CookingHub.com, including all recipes, articles, and other materials, is for general informational purposes only. This content reflects the personal opinions and experiences of its authors and is not intended to provide professional dietary, medical, legal, or political advice. Please consult a qualified professional before making any decisions based on the information presented here.
- Content Ownership and Use Content on this page above, including content published on CookingHub.com is owned by the individual authors who created it. Only the authors can access, modify, or delete their content from the platform. Our content may be embedded on third-party websites and blogs without modification. No reimbursement will be provided for this use. If an author removes content from CookingHub.com, it will no longer be available through any embedded links.
- Limitation of Liability Neither www.CookingHub.com (operated by the CookingHub Foundation) nor content authors are responsible for any outcome or consequence resulting from the use of information on this site. This includes, but is not limited to:
- Food Safety: Any health risk related to food handling, food quality, or failure to follow USDA recommendations (including minimum safe cooking temperatures).
- Preparation Safety: The proper and safe handling of cooking equipment or its suitability for any given task.
- Recipe Outcomes: The final look, taste, or success of following a recipe.
- Ingredients and Equipment: The sourcing of ingredients, tools, equipment, or anything else related to the preparation and consumption of food.
- Nutritional and Dietary Information: The accuracy of nutritional data. This information is provided as a courtesy and should not replace advice from a medical provider. You are responsible for verifying that a diet is suitable for your personal health needs.
- Errors and Omissions: Any potential errors, typos, or unclear directions in articles and recipes.
- User Responsibility All readers, visitors, and users of embedded content are solely responsible for evaluating recipes and articles. You must make your own decisions about whether to follow the steps and recommendations provided. It is your responsibility to ensure that ingredients and preparation methods are safe and appropriate for your personal dietary restrictions and health conditions.
Share
Click on the icons below to share "Title of the item to share"