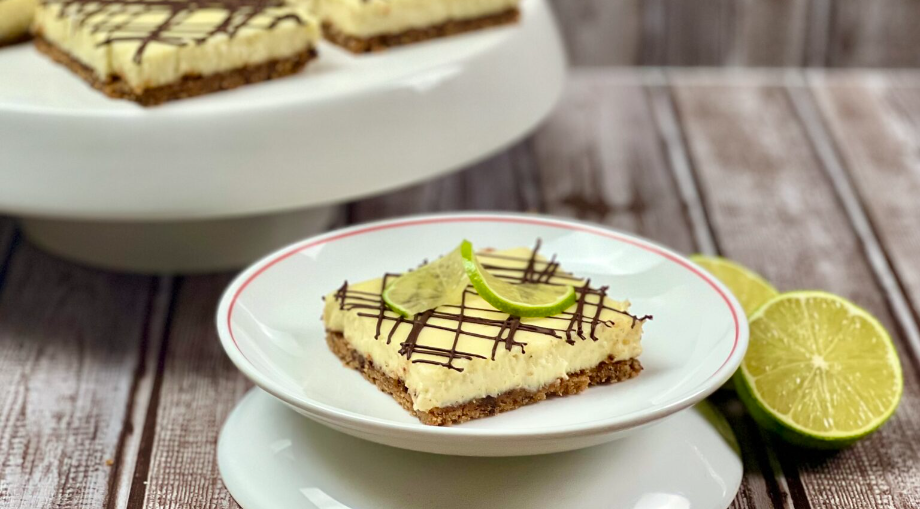
Cook, Learn, and Share to Fight Hunger.
  • 60 min.
  • 180 min.
  • 2/5

Ingredients:

Curst:

Filling:

Optionally serve with:

Directions:

1. Preparation:

  • Pre heat the oven to 350°F.
  • Line a 9 x 13 baking pan with parchment or aluminum foil leaving an overhang.

2. Crust:

  • Combine all the crust ingredients in a bowl and mix well.
  • Lightly spray the prepared pan with cooking spray and press the crust mixture evenly into the bottom.
  • Bake at 350°F for 10-15 minutes until golden. Remove and allow it to cool completely.
  • Place a small baking dish with some water in it on the bottom rack of the oven.

3. Filling:

  • Place the cream cheese and granulated sugar in the bowl of a stand mixer fitted with a flat beater attachment. Or use a large bowl and a hand mixer.
  • Beat the cream cheese and sugar for a couple minutes to combine then scrape down the bowl and mix again for a minute. You don’t want to add a lot of air so don’t mix for more than about 3 minutes.
  • Add the eggs one at a time mixing until each is fully incorporated.
  • Add the vanilla and salt and mix until combined. Scrape down the bowl.
  • With the mixer on low add in the key lime juice and mix until combined.
  • Add in the flour and mix well. Scrape down the bowl.
  • Remove the bowl from the stand mixer and fold in the lime zest.
  • Pour the filling into the baked crust and smooth it out; tap it on the counter a couple of times to remove any large air bubbles.
  • Place it in the oven on the middle rack and bake for 20-25 minutes until set but still a little jiggly.
  • Open the oven door slightly and allow the cheesecake to cool in there for about 20-30 minutes.
  • Remove from the oven and cool on a rack to room temperature.
  • Once cooled to room temperature, place it in the fridge uncovered to cool completely – at least 2 hours up to overnight.

4. Finalize & Serve Key Lime Cheesecake Bars:

  • Once cooled completely, use the overhang of parchment or foil to remove the slab from the pan. Cut into 12 equal pieces (or 24 if you prefer smaller bites).
  • Melt the remaining 2 oz of chocolate from the bar, and place it in a piping bag or a freezer bag, and cut a small hole in the corner.
  • Drizzle the cut bars with the chocolate and serve – serve with whipped cream if you like.

Notes:

  • The addition of the chocolate to the crust and as a drizzle reminds me of the chocolate-dipped key lime pie I had in Key West many years ago. It is completely optional if you prefer not to use it.
  • You could use white chocolate or milk chocolate if you prefer – I used dark 60% chocolate when I made this.
  • If you want to buy key limes and juice them yourself, you can – they are tiny, and you willed a lot. I use bottled key lime juice that is of good quality and readily available everywhere.
  • It is important to cool these bars slowly – as with a regular cheesecake, if you chill it too quickly, it may crack. It will still be delicious even if it cracks!!
About the Author:
ChefLynnCool Cook
# 3
  • Published Recipes: 23
  • Av. Recipe Evaluation:
  • Location: Florida, USA
  • Member since: 2024-09-08

Disclaimer

  1. General Information Content on this page above, including the content provided on www.CookingHub.com, including all recipes, articles, and other materials, is for general informational purposes only. This content reflects the personal opinions and experiences of its authors and is not intended to provide professional dietary, medical, legal, or political advice. Please consult a qualified professional before making any decisions based on the information presented here.
  2. Content Ownership and Use Content on this page above, including content published on CookingHub.com is owned by the individual authors who created it. Only the authors can access, modify, or delete their content from the platform. Our content may be embedded on third-party websites and blogs without modification. No reimbursement will be provided for this use. If an author removes content from CookingHub.com, it will no longer be available through any embedded links.
  3. Limitation of Liability Neither www.CookingHub.com (operated by the CookingHub Foundation) nor content authors are responsible for any outcome or consequence resulting from the use of information on this site. This includes, but is not limited to:
    • Food Safety: Any health risk related to food handling, food quality, or failure to follow USDA recommendations (including minimum safe cooking temperatures).
    • Preparation Safety: The proper and safe handling of cooking equipment or its suitability for any given task.
    • Recipe Outcomes: The final look, taste, or success of following a recipe.
    • Ingredients and Equipment: The sourcing of ingredients, tools, equipment, or anything else related to the preparation and consumption of food.
    • Nutritional and Dietary Information: The accuracy of nutritional data. This information is provided as a courtesy and should not replace advice from a medical provider. You are responsible for verifying that a diet is suitable for your personal health needs.
    • Errors and Omissions: Any potential errors, typos, or unclear directions in articles and recipes.
  4. User Responsibility All readers, visitors, and users of embedded content are solely responsible for evaluating recipes and articles. You must make your own decisions about whether to follow the steps and recommendations provided. It is your responsibility to ensure that ingredients and preparation methods are safe and appropriate for your personal dietary restrictions and health conditions.