* I like to use a combination of strawberries, blueberries, raspberries, and blackberries, but this can be great with plums or peaches, or cherries.
Bublanina (Czech Bubble Cake)
12 servings
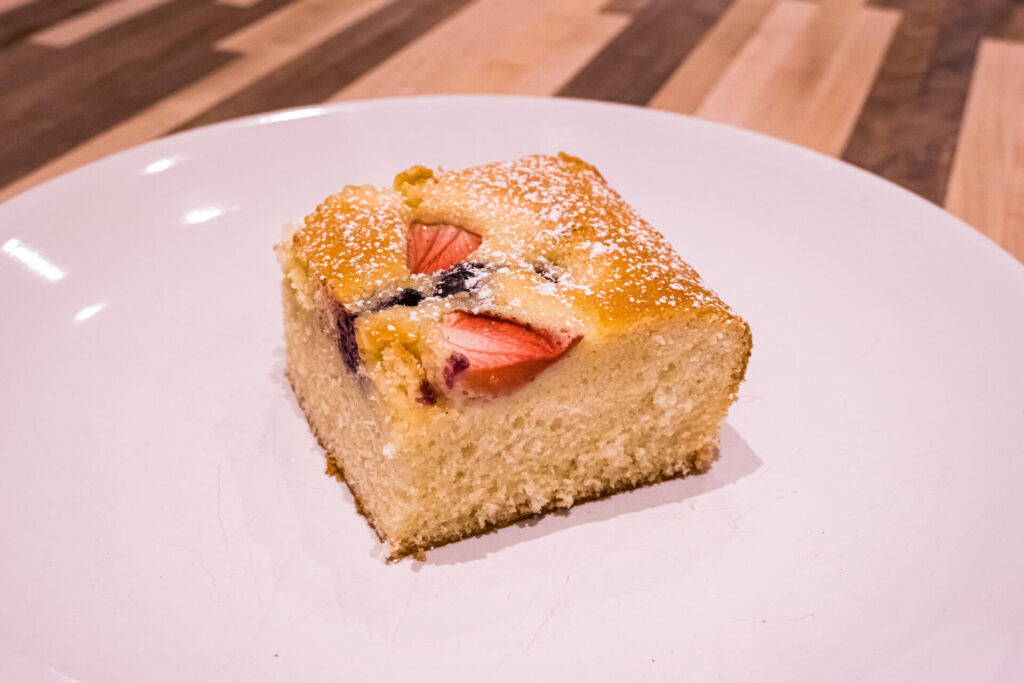
This traditional Czech dessert called bublanina (bubble cake) is out of this world. This cake-like treat is easy and fun to make, and it is typical for its’ light vanilla and lemon undertone. A touch of gentle fruit on the top of the cake nicely balances and brings together the...
Read more... whole experience. Add a dusting of powdered sugar, and bublanina is ready to be served.
Read lessx saved
 Tom the Chef Founder
January 31, 2024
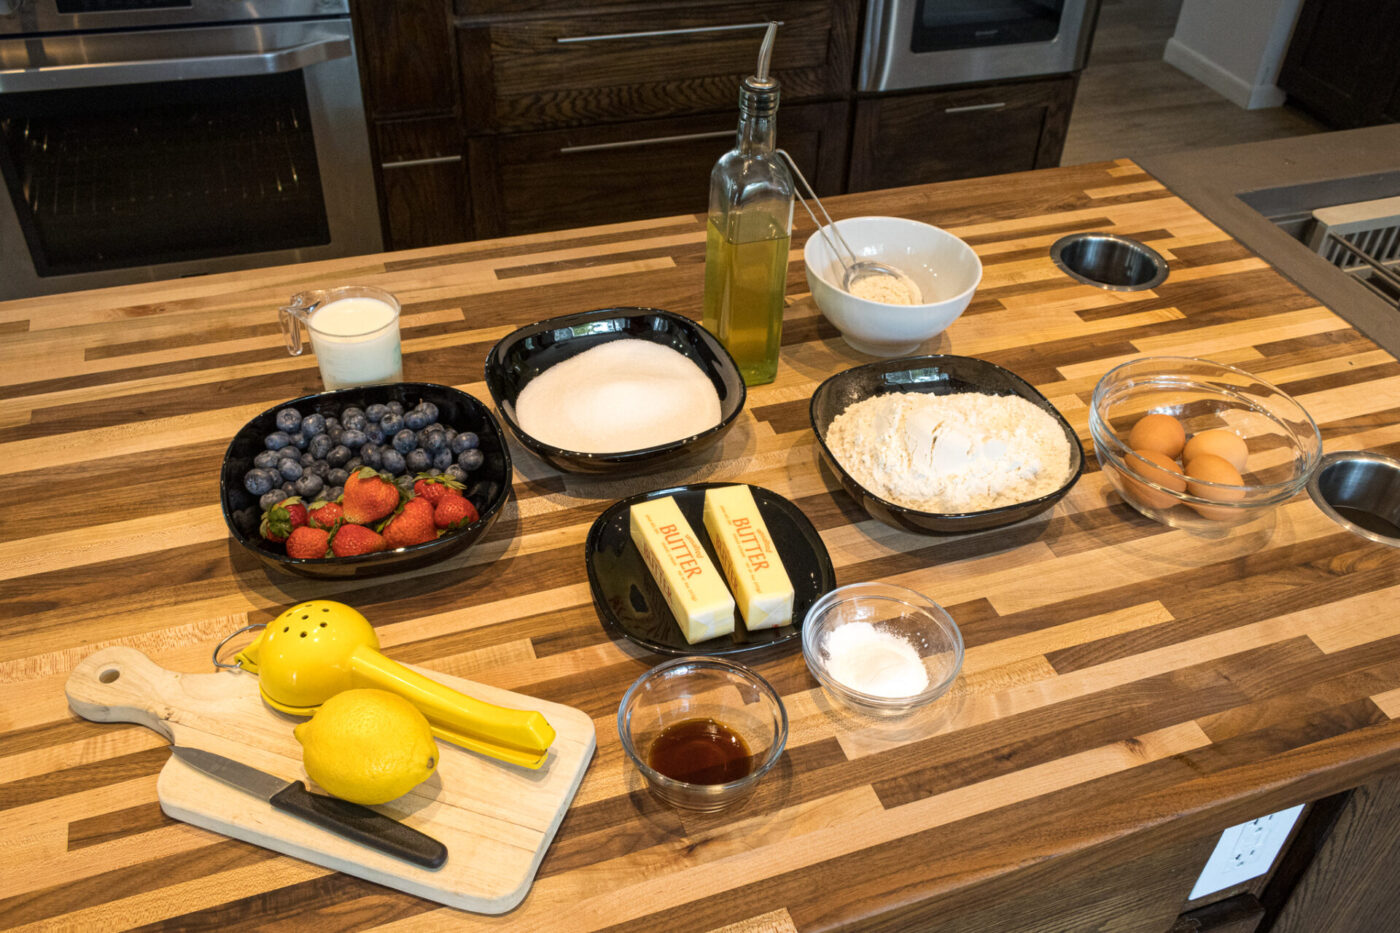
Ingredients:
Bubble cake:
- 2 sticks of unsalted butter - room temperature (½ LB)
- 4 egg - room temperature (remove from the fridge about an hour before you start)
- 1 ½ cups of granulated sugar
- 1 TBSP of baking powder
- 1 cup of milk
- 3 cups of all-purpose flour
- Juice from 1 lemon
- 2 cups of fresh fruit of your choice (*)
Greasing form:
- 1 TSP of oil (any kind)
- 2 TBSP of all-purpose flour (adjust if needed)
Directions:
1. Before you start:
1.1.
Set oven to 320°F.
1.2.
Grease and flour your baking dish.
2. The batter:
2.1. Place into a kitchen mixer with a whisk attachment:
2 sticks of butter – soft
4 eggs
1 ½ cups of granulated sugar
Whisk on high speed until all ingredients nicely combine and turn together into a creamy texture (about 3 – 5 minutes).
2.2. Add:
1 TBSP of baking powder
1 TSP of vanilla extract
Process on high speed until fully incorporated for about 2 minutes.
2.3. Add:
1 cup of milk
3 cups of all-purpose flour
Juice from 1 lemon
Process on medium speed until fully combined (about 2 minutes).
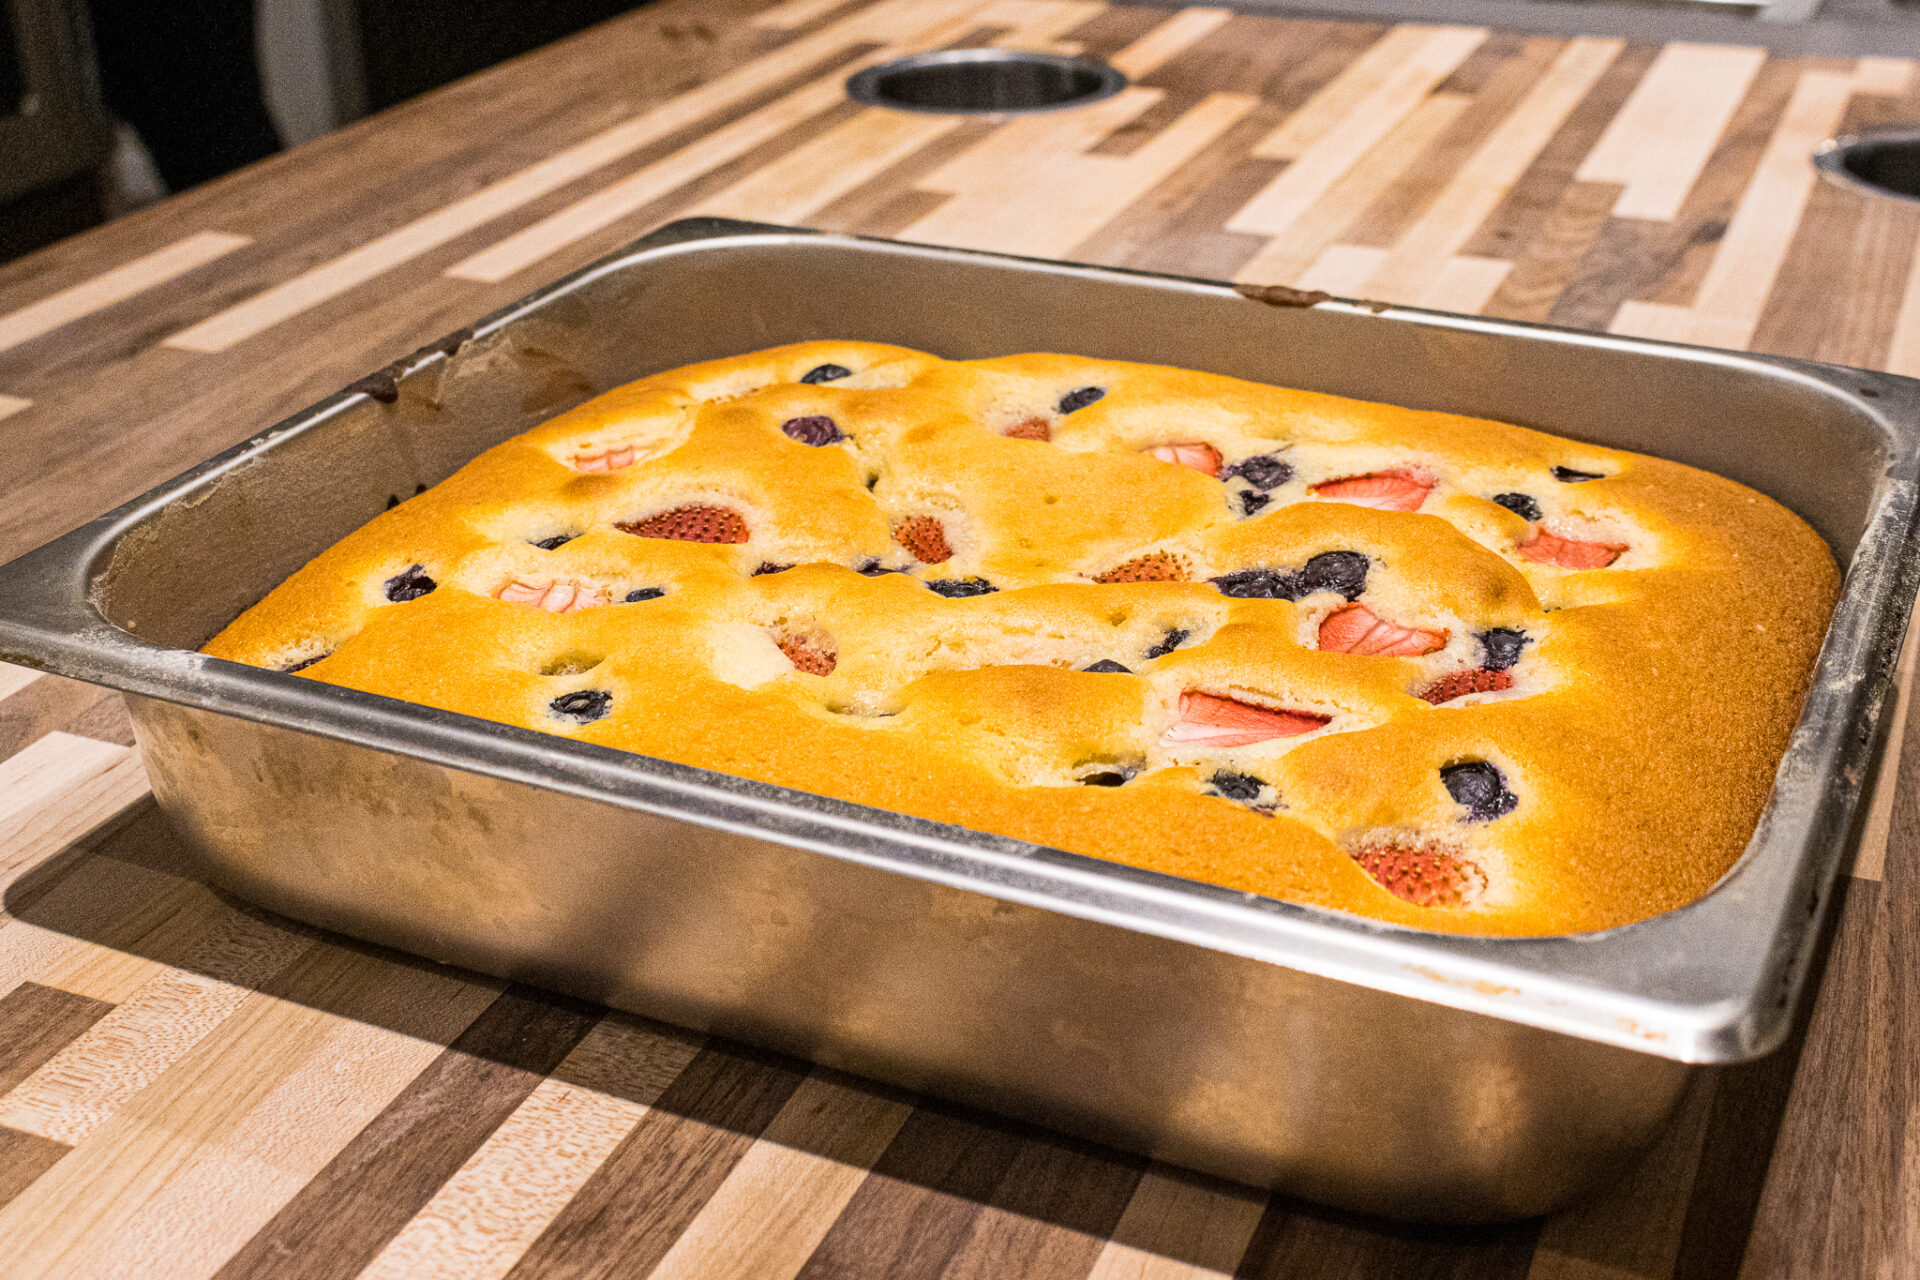
3. Assembly:
3.1.
Gently pour and distribute the batter in a baking dish using a silicone spatula.
3.2. Place the fruit of your choice on top of the batter after the fruit is prepared.
Important:
When using strawberries and other fruit of the same size or larger, it is best to cut into smaller pieces so they don’t “sink through” (additionally, a slice of strawberry also adds a nice visual effect on the top of the cake).
4. Bake:
4.1.
Bake in a preheated oven until fully baked (about 50 – 60 minutes, it may take a little longer, especially if you bake more than one thing at a time in your oven).
4.2.
Test with a toothpick.
4.3.
Let fully cool before further manipulation and serving.
5. Serving:
5.1. After fully cooled, leave it in the pan and cut it into approximately 12 even pieces (or adjust to your preference).
Note:
This will make it very easy to scoop each piece out for serving. If you grease and flour your baking dish well, you can also flip the bublanina out before cutting.
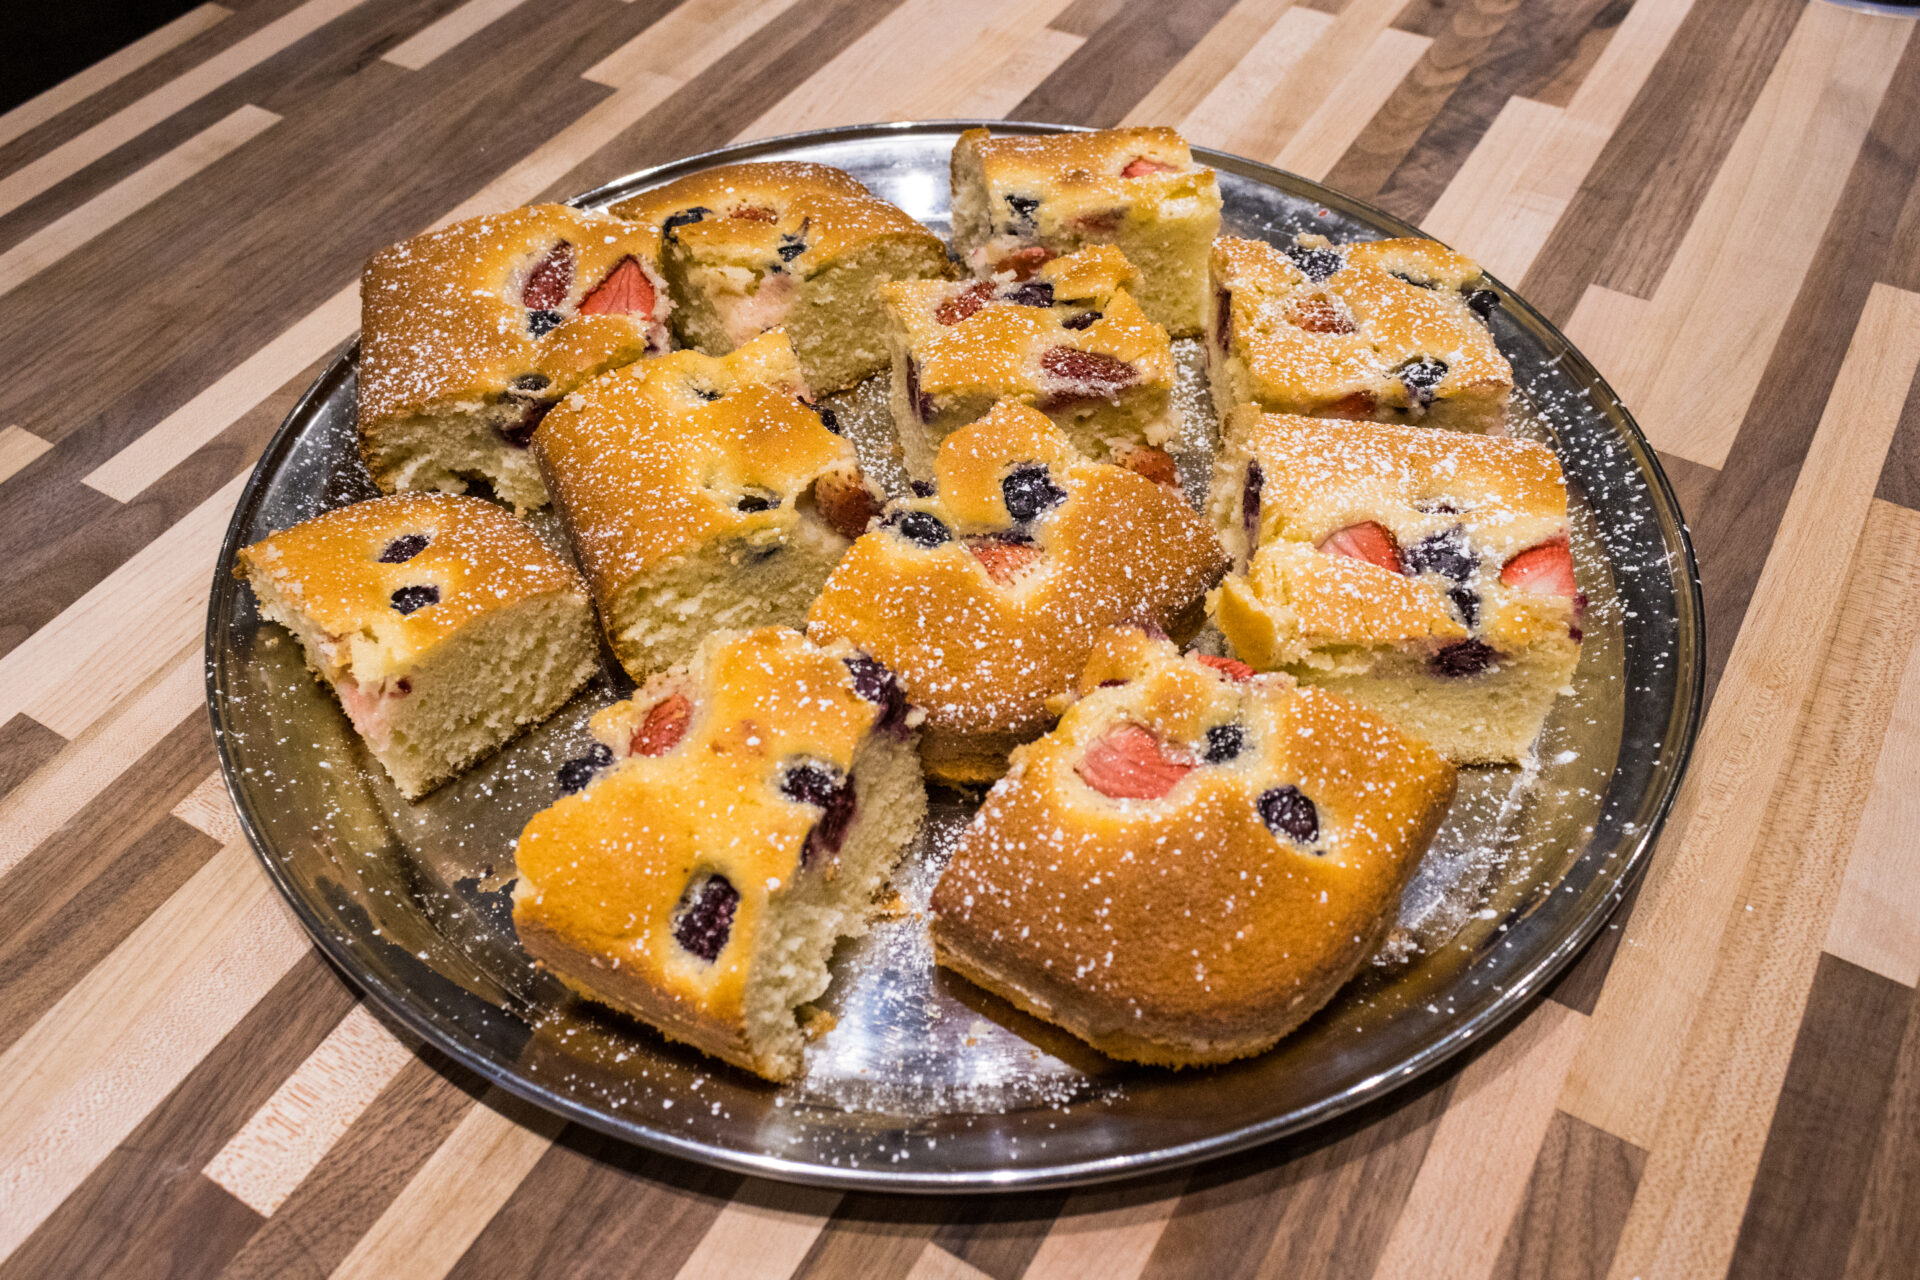
5.2.
Serve with a gentle touch of powdered sugar.
If parts of the ingredients stick to the side of the kitchen mixer during processing, stop the mixer, and use a spatula to mix it back in. Then, continue processing.
About the Author:
Tom the ChefFounder
# 1
210 Followers
- Published Recipes: 270
- Av. Recipe Evaluation:
- Location: Iowa, USA
- Member since: 2023-02-02
Recipes
Try Other Recipes from Same Category!
Banana Bread Recipe
Tom the Chef FounderPumpkin Cheesecake
Classic Zucchini Bread Recipe
Banana Bread Recipe
Keto Chocolate Sunflower Spread Stuffed Cookie Bars
 olivia.wyles Resident Chef
Strawberry Cream Cake
 ChefLynn Cool Cook
Eggnog Pumpkin Flan Cake – "Holiday Chocoflan"
ChefLynn Cool CookSpiced Sweet Potato Cheesecake
ChefLynn Cool CookKey Lime Cheesecake Bars
ChefLynn Cool CookEasy & Fudgy Brownies
Disclaimer
- General Information Content on this page above, including the content provided on www.CookingHub.com, including all recipes, articles, and other materials, is for general informational purposes only. This content reflects the personal opinions and experiences of its authors and is not intended to provide professional dietary, medical, legal, or political advice. Please consult a qualified professional before making any decisions based on the information presented here.
- Content Ownership and Use Content on this page above, including content published on CookingHub.com is owned by the individual authors who created it. Only the authors can access, modify, or delete their content from the platform. Our content may be embedded on third-party websites and blogs without modification. No reimbursement will be provided for this use. If an author removes content from CookingHub.com, it will no longer be available through any embedded links.
- Limitation of Liability Neither www.CookingHub.com (operated by the CookingHub Foundation) nor content authors are responsible for any outcome or consequence resulting from the use of information on this site. This includes, but is not limited to:
- Food Safety: Any health risk related to food handling, food quality, or failure to follow USDA recommendations (including minimum safe cooking temperatures).
- Preparation Safety: The proper and safe handling of cooking equipment or its suitability for any given task.
- Recipe Outcomes: The final look, taste, or success of following a recipe.
- Ingredients and Equipment: The sourcing of ingredients, tools, equipment, or anything else related to the preparation and consumption of food.
- Nutritional and Dietary Information: The accuracy of nutritional data. This information is provided as a courtesy and should not replace advice from a medical provider. You are responsible for verifying that a diet is suitable for your personal health needs.
- Errors and Omissions: Any potential errors, typos, or unclear directions in articles and recipes.
- User Responsibility All readers, visitors, and users of embedded content are solely responsible for evaluating recipes and articles. You must make your own decisions about whether to follow the steps and recommendations provided. It is your responsibility to ensure that ingredients and preparation methods are safe and appropriate for your personal dietary restrictions and health conditions.
Share
Click on the icons below to share "Title of the item to share"